本文自动转发自我的博客: http://www.haofengjing.org/?p=1659
wordpress建站历程 | 好风景.
2014年3月2日星期日
[]Android REST Client架构实践 第一篇
本文自动转发自我的博客: http://www.haofengjing.org/?p=1653
摘要:今年一直断断续续在做一个基于昊哥的一套很重的REST API的Android Client,其实也是第一次做Android,而且是按照Google I/O 2010 – Android REST client applications(请自行翻墙:)的指导做一个REST的客户端,遇到各种问题所以特地记录一下。第一篇就概述一下: 1.REST API以及我所调用的的REST API的特点 2.Google I/O大会上提出的Android REST Client的建议架构 一、关于REST API REST架构的优势,广泛应用这些废话就不说了,网上的讨论都已经够多了,有兴趣的Google之吧,而REST的核心概念,解析这些我的另一个系列《REST学习实践》会陆续添加,这里就不赘述了。简单的说就是:1.用Url表示资源 2.对资源的操作包括获取、创建、修改和删除资源,这些操作正好对应 HTTP 协议提供的 GET、POST、PUT 和 DELETE 方法 二、从Dev角度总结我所调用的REST API的特点 1.提供两种Data Formats,JSON和XML,我用的JSON,插播一段JSON简介吧: JSON是一种传递对象的语法,对象可以是name/value对,数组和其他对象。 下面是段JSON代码 1: { 2: "skillz": { 3: "web": [{ 4: "name": "html", 5: "years": "5" 6: }, 7: { 8: "name": "css", 9: "years": "3" 10: }], 11: "database": [{ 12: "name": "sql", 13: "years": "7" 14: }] 15: } 16: } 使用JSON的原因主要是JSON的解析速度据称比XML快10倍,其实Javascript上用的更多一些,有比较好的支持。 2.Authentication 权限 由于REST本身并没有标准,所以似乎并没有对权限这块做什么规定,在一些需要登录使用的API上我们用的是一套类似于OAuth的授权机制: a.向REST Service请求Login b.取得一个临时Token c.在一段时间内在HTTP Header带Token请求受保护的内容 至于Token的生成和更新就是Server端的工作了。 3.REST Request Url内嵌查询表达式 昊哥的REST Service提供了一套强大的查询表达式,类似于一个简单的编译器,Client可以在Request中带类似"q=AND(keyword:智能手机)(NOT(keyword:Nokia))(price:<1000)(city:~湖北~武汉)"来查询"在武汉1000元以下不是Nokia的智能手机". 那么在这套REST API当中一个标准请求的Example就是 http://www.restexample.com/items/@all?c={PAGEINDEX}&max-results={PAGESIZE}&q={QUERYEXPRESSION}&orderby={ORDERBY}&partial={WANTEDFIELDS} 三、Google I/O 2010 Session上建议的Android REST Client App的架构 第一篇的话我就先抛个引子吧,上两个Session里的架构示例: 1.错误的范例 Android_rest_wrong 这其实还算是一般HTTP Client写法中比较好的,因为另开线程去处理HTTP Client,不会阻塞UI线程,但缺点也一样突出: Android OS可能会随时干掉这个Activity,比如在运行APP的时候突然接个电话就有可能被杀死,那么数据没有持久化的话,只能再次请求,这样糟糕的体验加过多流量足以让用户跟你的APP说滚蛋了…….. 2.最佳范例 Android_rest 这是Google I/O上主推的建议Android REST Client,它的优点自然是解决了上面例子的缺点了,但Google不太厚道呀,说了自己的Android 上GMail,GReader等都是用这套架构完成的,却没给Demo代码,这里面用到的IntentService和ResultReceiver的文档支持也很少,搞得各大论坛上都有人讨论但实现的方案倒不多,希望本系列能给出一个比较完整的解决方案吧~~ 本文就完了,下一篇主要对比Google I/O Session上的Android REST Client架构………. PS:关于昊哥很重的WCF REST Service,有兴趣的可传送至昊哥的Blog文章我的WCF4 Rest Service及Entity Framework with POCO之旅
摘要:今年一直断断续续在做一个基于昊哥的一套很重的REST API的Android Client,其实也是第一次做Android,而且是按照Google I/O 2010 – Android REST client applications(请自行翻墙:)的指导做一个REST的客户端,遇到各种问题所以特地记录一下。第一篇就概述一下: 1.REST API以及我所调用的的REST API的特点 2.Google I/O大会上提出的Android REST Client的建议架构 一、关于REST API REST架构的优势,广泛应用这些废话就不说了,网上的讨论都已经够多了,有兴趣的Google之吧,而REST的核心概念,解析这些我的另一个系列《REST学习实践》会陆续添加,这里就不赘述了。简单的说就是:1.用Url表示资源 2.对资源的操作包括获取、创建、修改和删除资源,这些操作正好对应 HTTP 协议提供的 GET、POST、PUT 和 DELETE 方法 二、从Dev角度总结我所调用的REST API的特点 1.提供两种Data Formats,JSON和XML,我用的JSON,插播一段JSON简介吧: JSON是一种传递对象的语法,对象可以是name/value对,数组和其他对象。 下面是段JSON代码 1: { 2: "skillz": { 3: "web": [{ 4: "name": "html", 5: "years": "5" 6: }, 7: { 8: "name": "css", 9: "years": "3" 10: }], 11: "database": [{ 12: "name": "sql", 13: "years": "7" 14: }] 15: } 16: } 使用JSON的原因主要是JSON的解析速度据称比XML快10倍,其实Javascript上用的更多一些,有比较好的支持。 2.Authentication 权限 由于REST本身并没有标准,所以似乎并没有对权限这块做什么规定,在一些需要登录使用的API上我们用的是一套类似于OAuth的授权机制: a.向REST Service请求Login b.取得一个临时Token c.在一段时间内在HTTP Header带Token请求受保护的内容 至于Token的生成和更新就是Server端的工作了。 3.REST Request Url内嵌查询表达式 昊哥的REST Service提供了一套强大的查询表达式,类似于一个简单的编译器,Client可以在Request中带类似"q=AND(keyword:智能手机)(NOT(keyword:Nokia))(price:<1000)(city:~湖北~武汉)"来查询"在武汉1000元以下不是Nokia的智能手机". 那么在这套REST API当中一个标准请求的Example就是 http://www.restexample.com/items/@all?c={PAGEINDEX}&max-results={PAGESIZE}&q={QUERYEXPRESSION}&orderby={ORDERBY}&partial={WANTEDFIELDS} 三、Google I/O 2010 Session上建议的Android REST Client App的架构 第一篇的话我就先抛个引子吧,上两个Session里的架构示例: 1.错误的范例 Android_rest_wrong 这其实还算是一般HTTP Client写法中比较好的,因为另开线程去处理HTTP Client,不会阻塞UI线程,但缺点也一样突出: Android OS可能会随时干掉这个Activity,比如在运行APP的时候突然接个电话就有可能被杀死,那么数据没有持久化的话,只能再次请求,这样糟糕的体验加过多流量足以让用户跟你的APP说滚蛋了…….. 2.最佳范例 Android_rest 这是Google I/O上主推的建议Android REST Client,它的优点自然是解决了上面例子的缺点了,但Google不太厚道呀,说了自己的Android 上GMail,GReader等都是用这套架构完成的,却没给Demo代码,这里面用到的IntentService和ResultReceiver的文档支持也很少,搞得各大论坛上都有人讨论但实现的方案倒不多,希望本系列能给出一个比较完整的解决方案吧~~ 本文就完了,下一篇主要对比Google I/O Session上的Android REST Client架构………. PS:关于昊哥很重的WCF REST Service,有兴趣的可传送至昊哥的Blog文章我的WCF4 Rest Service及Entity Framework with POCO之旅
[]How to Call Web Service in Android Using SOAP
本文自动转发自我的博客: http://www.haofengjing.org/?p=206
Step 8:
Now, open your "WebServiceDemo -> android.manifest" file. Add the following line before the tag:
This will allow the application to use the internet.
Step 9:
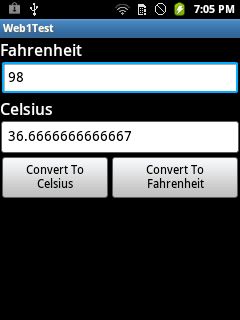
Run your application in the Android Cell. You will get the following outcome:
Note: In the emulator, we need to fix a proxy, so try the application in an Android Cell.
Summary
In this brief tutorial, we learned about Web Services, SOAP envelopes, WSDL files, HTTP transport, and how to use the in an Android application.
Introduction
In this tutorial, we will learn how to call a Web Service using SOAP (Simple Object Access Protocol).
Prerequisites
Web Service, SOAP envelope, WSDL (Web Service Definition Language)
What is SOAP?
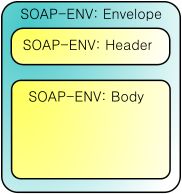
SOAP is a protocol specification for exchanging structured information in the implementation of Web Services in computer networks. It relies on Extensible Markup Language (XML) for its message format, and usually relies on other Application Layer protocols, most notably Hypertext Transfer Protocol (HTTP) and Simple Mail Transfer Protocol (SMTP), for message negotiation and transmission. The following is the structure of SOAP Envelope:
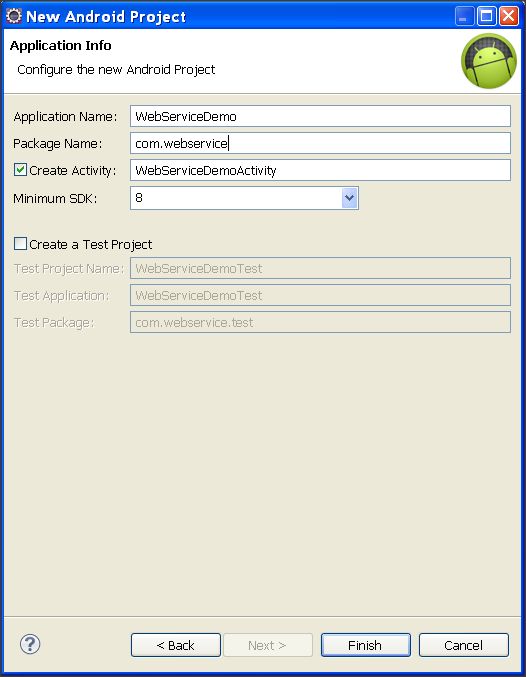
Step 1:
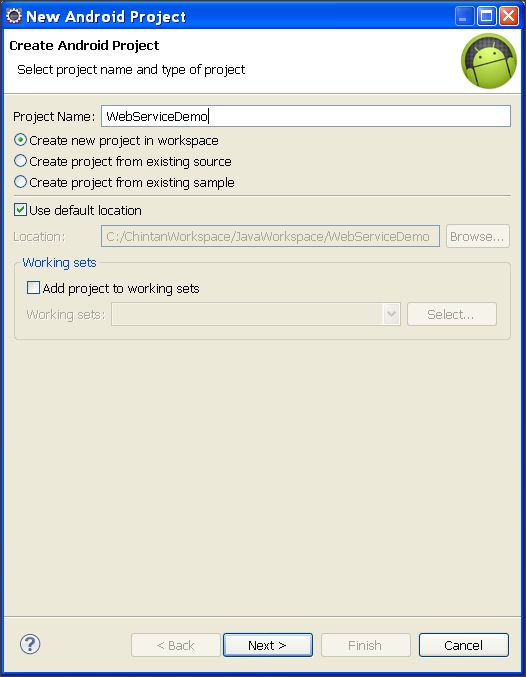
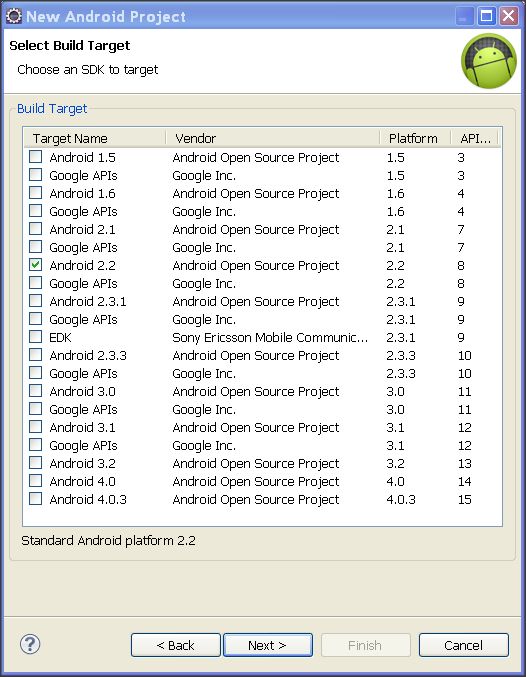
First create a "New Android Project". Name it "WebServiceDemo" like below.
Step 2:
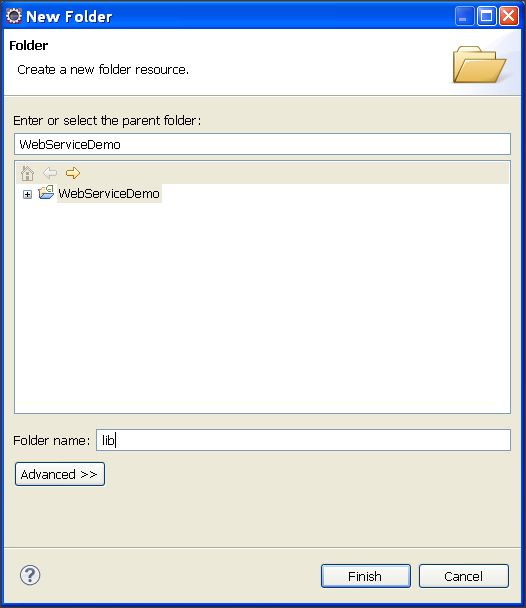
Now right-click on your "WebServiceDemo" project and select "New -> Folder"
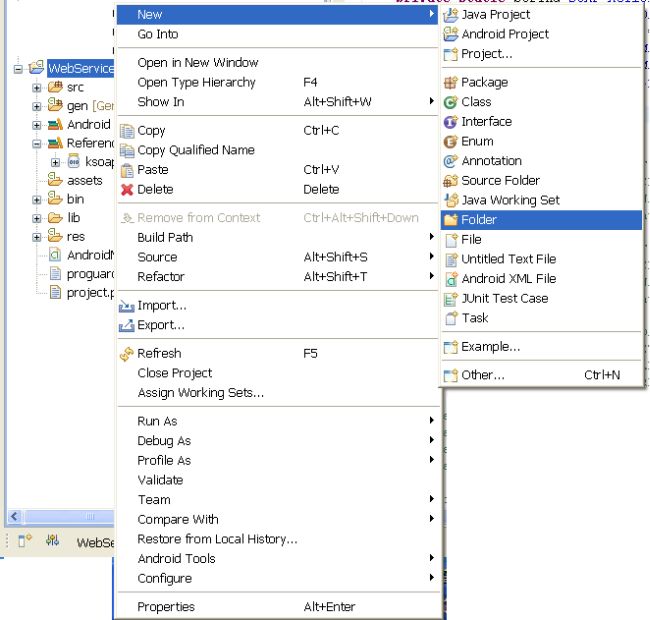
Now, give it a name it "lib". We need to add a SOAP library into this directory.
Step 3:
Now download the attached library named "ksoap2-android-assembly-2.6.0-jar-with-dependencies.jar". Copy that file and paste it into the "lib" directory.
After copying, do the following steps:
In this tutorial, we will learn how to call a Web Service using SOAP (Simple Object Access Protocol).
Prerequisites
Web Service, SOAP envelope, WSDL (Web Service Definition Language)
What is SOAP?
SOAP is a protocol specification for exchanging structured information in the implementation of Web Services in computer networks. It relies on Extensible Markup Language (XML) for its message format, and usually relies on other Application Layer protocols, most notably Hypertext Transfer Protocol (HTTP) and Simple Mail Transfer Protocol (SMTP), for message negotiation and transmission. The following is the structure of SOAP Envelope:
Step 1:
First create a "New Android Project". Name it "WebServiceDemo" like below.
Step 2:
Now right-click on your "WebServiceDemo" project and select "New -> Folder"
Now, give it a name it "lib". We need to add a SOAP library into this directory.
Step 3:
Now download the attached library named "ksoap2-android-assembly-2.6.0-jar-with-dependencies.jar". Copy that file and paste it into the "lib" directory.
After copying, do the following steps:
- Right-click on the project.
- Go "Build Path -> Configure Build Path"
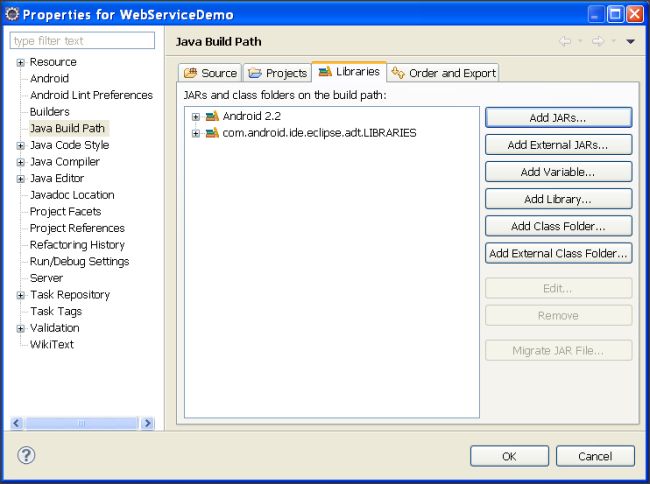
- Now, click on "Add Jars" and select ".jar" file from "project -> lib" directory.
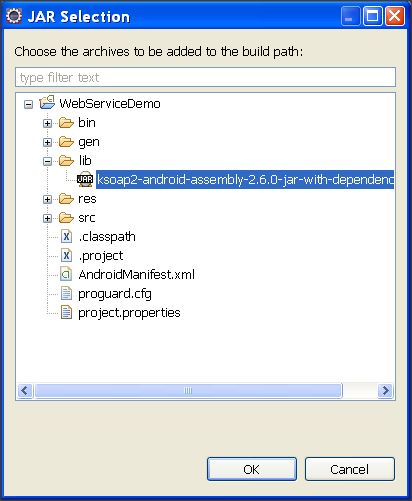
- Click on "Ok" to finish the procedure of adding library to Android application.
Step 4:
Next we need to create a layout of screen. To do so, go to "WebServiceDemo -> res -> layout -> main.xml"
Open this xml file in editing mode, and place below code.
Main.xml
Next we need to create a layout of screen. To do so, go to "WebServiceDemo -> res -> layout -> main.xml"
Open this xml file in editing mode, and place below code.
Main.xml
xml version="1.0" encoding="utf-8"?>
<LinearLayout xmlns:android="http://schemas.android.com/apk/res/android"
android:layout_width="match_parent"
android:layout_height="match_parent"
android:orientation="vertical" >
<TextView
android:id="@+id/textView1"
android:layout_width="wrap_content"
android:layout_height="wrap_content"
android:text="Fahrenheit"
android:textAppearance="?android:attr/textAppearanceLarge" />
<EditText
android:id="@+id/txtFar"
android:layout_width="match_parent"
android:layout_height="wrap_content" >
<requestFocus />
EditText>
<TextView
android:id="@+id/textView2"
android:layout_width="wrap_content"
android:layout_height="wrap_content"
android:text="Celsius"
android:textAppearance="?android:attr/textAppearanceLarge" />
<EditText
android:id="@+id/txtCel"
android:layout_width="match_parent"
android:layout_height="wrap_content" />
<LinearLayout
android:id="@+id/linearLayout1"
android:layout_width="match_parent"
android:layout_height="wrap_content" >
<Button
android:id="@+id/btnFar"
android:layout_width="wrap_content"
android:layout_height="wrap_content"
android:layout_weight="0.5"
android:text="Convert To Celsius" />
<Button
android:id="@+id/btnCel"
android:layout_width="wrap_content"
android:layout_height="wrap_content"
android:layout_weight="0.5"
android:text="Convert To Fahrenheit" />
LinearLayout>
<Button
android:id="@+id/btnClear"
android:layout_width="match_parent"
android:layout_height="wrap_content"
android:text="Clear" />
LinearLayout>
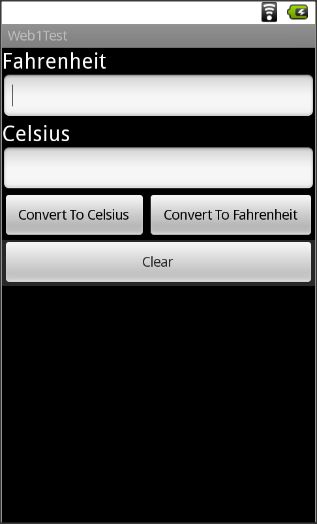
This will create simple following screen.
Step 5:
Now, find out any Web Service, make sure that you can view its WSDL file by writing "?wsdl" after that address.
For example, you have a web service like http://www.w3schools.com/webservices/tempconvert.asmx", so to view the WSDL file, simply write "?wsdl" after this address like:
http://www.w3schools.com/webservices/tempconvert.asmx?WSDL".
You are now done with the Web Service part from the internet. Now you need to extend some portion of the WSDL file. Open the first link in your browser, it will display 2 conversions for you:
- CelsiusToFahrenheit
- FahrenheitToCelsius
Select anyone of them, and you will see following screen:
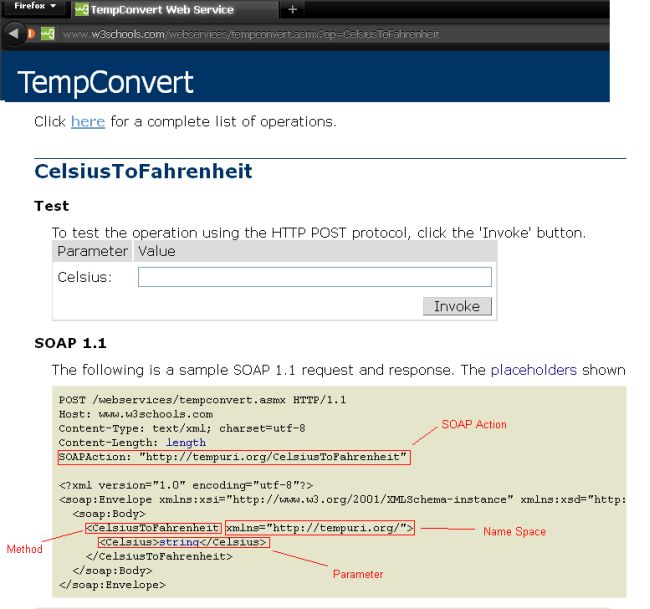
For CelsiusToFahrenheit:
For CelsiusToFahrenheit:
- SOAP_ACTION = "http://tempuri.org/CelsiusToFahrenheit";
- NAMESPACE = "http://tempuri.org/";
- METHOD_NAME = "CelsiusToFahrenheit";
For FahrenheitToCelsius:
- SOAP_ACTION = "http://tempuri.org/FahrenheitToCelsius";
- NAMESPACE = "http://tempuri.org/";
- METHOD_NAME = " FahrenheitToCelsius ";
Step 6:
You need to understand some classes before proceeding to use a Web Service.
You need to understand some classes before proceeding to use a Web Service.
- SoapObject (
A simple dynamic object that can be used to build SOAP calls without implementing KvmSerializable. Essentially, this is what goes inside the body of a SOAP envelope - it is the direct subelement of the body and all further sub elements. Instead of this class, custom classes can be used if they implement the KvmSerializable interface.
Constructor:
SoapObject (java.lang.String namespace, java.lang.String method)
- SoapSerializationEnvelope
This class extends the SoapEnvelope with Soap Serialization functionality.
Constructor:
SoapSerializationEnvelope (int version)
Fields:TypeFieldDescriptionbooleandotNetSet this variable to true for compatibility with what seems to be the default encoding for .Net-Services.Methods:Return TypeMethod NameDescriptionvoidsetOutputSoapObject(java.lang.Object soapObject)Assigns the object to the envelope as the outbound message for the soap call. - HttpTransportSE (org.ksoap2.transport.HttpTransportSE)
A J2SE based HttpTransport layer.
Constructor:
HttpTransportSE(java.lang.String url)
Method:Return TypeMethodDescriptionvoidcall(java.lang.String SoapAction, SoapEnvelope envelope)set the desired soapAction header field
Step 7:
Open your "WebServiceDemo -> src -> WebServiceDemoActivity.java" file and enterr following code:
WebServiceDemoActivity.java
Open your "WebServiceDemo -> src -> WebServiceDemoActivity.java" file and enterr following code:
WebServiceDemoActivity.java
import org.ksoap2.SoapEnvelope;
import org.ksoap2.serialization.SoapObject;
import org.ksoap2.serialization.SoapSerializationEnvelope;
import org.ksoap2.transport.HttpTransportSE;
import android.app.Activity;
import android.os.Bundle;
import android.view.View;
import android.widget.Button;
import android.widget.EditText;
import android.widget.Toast;
public class WebServiceDemoActivity extends Activity
{
/** Called when the activity is first created. */
private static String SOAP_ACTION1 = "http://tempuri.org/FahrenheitToCelsius";
private static String SOAP_ACTION2 = "http://tempuri.org/CelsiusToFahrenheit";
private static String NAMESPACE = "http://tempuri.org/";
private static String METHOD_NAME1 = "FahrenheitToCelsius";
private static String METHOD_NAME2 = "CelsiusToFahrenheit";
private static String URL = "http://www.w3schools.com/webservices/tempconvert.asmx?WSDL";
Button btnFar,btnCel,btnClear;
EditText txtFar,txtCel;
@Override
public void onCreate(Bundle savedInstanceState)
{
super.onCreate(savedInstanceState);
setContentView(R.layout.main);
btnFar = (Button)findViewById(R.id.btnFar);
btnCel = (Button)findViewById(R.id.btnCel);
btnClear = (Button)findViewById(R.id.btnClear);
txtFar = (EditText)findViewById(R.id.txtFar);
txtCel = (EditText)findViewById(R.id.txtCel);
btnFar.setOnClickListener(new View.OnClickListener()
{
@Override
public void onClick(View v)
{
//Initialize soap request + add parameters
SoapObject request = new SoapObject(NAMESPACE, METHOD_NAME1);
//Use this to add parameters
request.addProperty("Fahrenheit",txtFar.getText().toString());
//Declare the version of the SOAP request
SoapSerializationEnvelope envelope = new SoapSerializationEnvelope(SoapEnvelope.VER11);
envelope.setOutputSoapObject(request);
envelope.dotNet = true;
try {
HttpTransportSE androidHttpTransport = new HttpTransportSE(URL);
//this is the actual part that will call the webservice
androidHttpTransport.call(SOAP_ACTION1, envelope);
// Get the SoapResult from the envelope body.
SoapObject result = (SoapObject)envelope.bodyIn;
if(result != null)
{
//Get the first property and change the label text
txtCel.setText(result.getProperty(0).toString());
}
else
{
Toast.makeText(getApplicationContext(), "No Response",Toast.LENGTH_LONG).show();
}
} catch (Exception e) {
e.printStackTrace();
}
}
});
btnCel.setOnClickListener(new View.OnClickListener()
{
@Override
public void onClick(View v)
{
//Initialize soap request + add parameters
SoapObject request = new SoapObject(NAMESPACE, METHOD_NAME2);
//Use this to add parameters
request.addProperty("Celsius",txtCel.getText().toString());
//Declare the version of the SOAP request
SoapSerializationEnvelope envelope = new SoapSerializationEnvelope(SoapEnvelope.VER11);
envelope.setOutputSoapObject(request);
envelope.dotNet = true;
try {
HttpTransportSE androidHttpTransport = new HttpTransportSE(URL);
//this is the actual part that will call the webservice
androidHttpTransport.call(SOAP_ACTION2, envelope);
// Get the SoapResult from the envelope body.
SoapObject result = (SoapObject)envelope.bodyIn;
if(result != null)
{
//Get the first property and change the label text
txtFar.setText(result.getProperty(0).toString());
}
else
{
Toast.makeText(getApplicationContext(), "No Response",Toast.LENGTH_LONG).show();
}
} catch (Exception e) {
e.printStackTrace();
}
}
});
btnClear.setOnClickListener(new View.OnClickListener()
{
@Override
public void onClick(View v)
{
txtCel.setText("");
txtFar.setText("");
}
});
}
}
Step 8:
Now, open your "WebServiceDemo -> android.manifest" file. Add the following line before the
This will allow the application to use the internet.
Step 9:
Run your application in the Android Cell. You will get the following outcome:
Note: In the emulator, we need to fix a proxy, so try the application in an Android Cell.
Summary
In this brief tutorial, we learned about Web Services, SOAP envelopes, WSDL files, HTTP transport, and how to use the in an Android application.
Article Extensions
Contents added by pugazhendhi p on Jul 22, 2013
Contents added by Chintan Rathod on Nov 21, 2012
Hi Friends,
I searched for the actual error that has Eclipse problem for "NoClassFound".
I have fixed this by following.
------------------
Right click "project" -> Properties -> Java Build Path -> Order And Explort
------------------

Now, make sure that, you have "Checked" that external added "jar" file as you can see in the snap.
Make sure that order of that external jar file also same like displayed in snap.
Now, Run your project and enjoy.
Thanks & Regards
---------------------
Chintan Rathod
I searched for the actual error that has Eclipse problem for "NoClassFound".
I have fixed this by following.
------------------
Right click "project" -> Properties -> Java Build Path -> Order And Explort
------------------
Now, make sure that, you have "Checked" that external added "jar" file as you can see in the snap.
Make sure that order of that external jar file also same like displayed in snap.
Now, Run your project and enjoy.
Thanks & Regards
---------------------
Chintan Rathod
Contents added by Chintan Rathod on Oct 23, 2012
Following are steps for How to configure Proxy in "Run Configuration" when you are using emulator
Step 1:
Right click on "project" -> Run As -> Run Configuration

Proxy -> your internet access IP address
port -> default 8080
Then click on "Apply".
Now, you can try to run web application in emulator, it will not give you any error regarding network connection.
Step 1:
Right click on "project" -> Run As -> Run Configuration
Proxy -> your internet access IP address
port -> default 8080
Then click on "Apply".
Now, you can try to run web application in emulator, it will not give you any error regarding network connection.
订阅:
博文 (Atom)