2012年12月14日星期五

Getting MySQL work with Entity Framework 4.0


Getting MySQL work with Entity Framework 4.0

Does MySQL work with Entity Framework 4.0? The answer is: yes, it works! I just put up one experimental project to play with MySQL and Entity Framework 4.0 and in this posting I will show you how to get MySQL data to EF. Also I will give some suggestions how to deploy your applications to hosting and cloud environments.

MySQL stuff

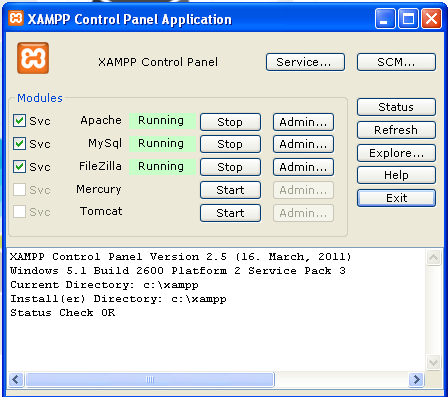
As you may guess you need MySQL running somewhere. I have MySQL installed to my development machine so I can also develop stuff when I’m offline. The other thing you need is MySQL Connector for .NET Framework. Currently there is available development version ofMySQL Connector/NET 6.3.5 that supports Visual Studio 2010.
Before you start download MySQL and Connector/NET:
If you are not big fan of phpMyAdmin then you can try out free desktop client for MySQL –HeidiSQL. I am using it and I am really happy with this program.
NB! If you just put up MySQL then create also database with couple of table there. To use all features of Entity Framework 4.0 I suggest you to use InnoDB or other engine that has support for foreign keys.

Connecting MySQL to Entity Framework 4.0

Now create simple console project using Visual Studio 2010 and go through the following steps.

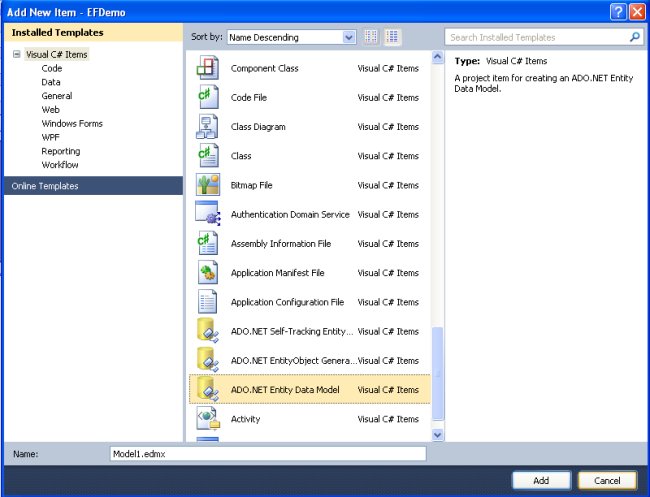
1. Add new ADO.NET Entity Data Model to your project.

For model insert the name that is informative and that you are able later recognize.

Adding ADO.NET Entity Data Model

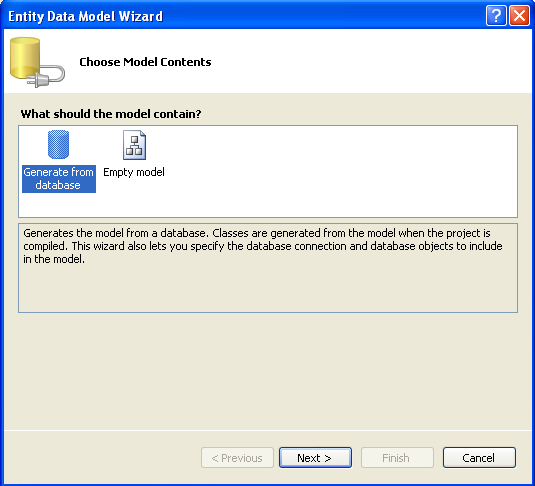
Now you can choose how you want to create your model. Select “Generate from database” and click OK.
Choosing source of model contents

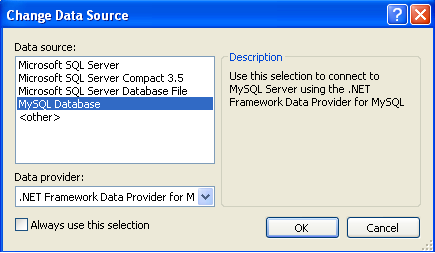
2. Set up database connection

Change data connection and select MySQL Database as data source. You may also need to set provider – there is only one choice. Select it if data provider combo shows empty value.
Changing data source
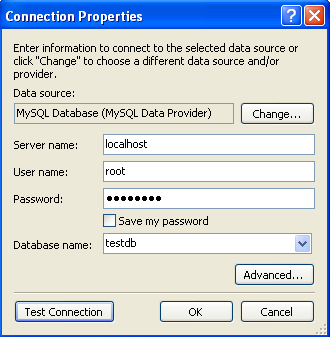
Click OK and insert connection information you are asked about. Don’t forget to click test connection button to see if your connection data is okay.
Setting connection properties
If everything works then click OK.

3. Insert context name

Now you should see the following dialog. Insert your data model name for application configuration file and click OK.
Data connection settings
Click next button.

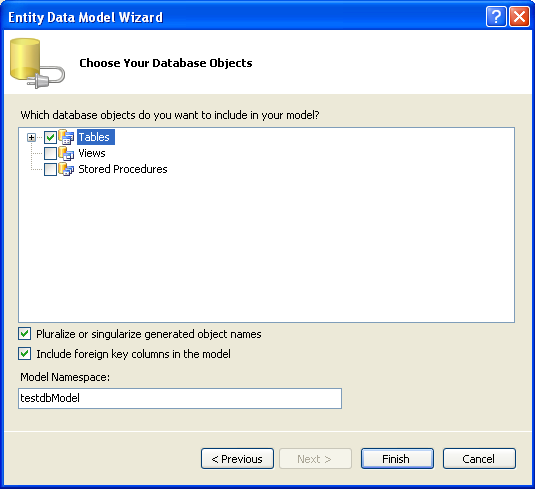
4. Select tables for model

Now you can select tables and views your classes are based on. I have small database with events data. Uncheck the checkbox “Include foreign key columns in the model” – it is damn annoying to get them away from model later. Also insert informative and easy to remember name for your model.
Select tables for model
Click finish button.

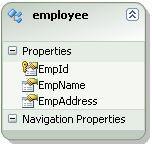
5. Define your classes

Now it’s time to define your classes. Here you can see what Entity Framework generated for you. Relations were detected automatically – that’s why we needed foreign keys. The names of classes and their members are not nice yet.
Automatically created classes
After some modifications my class model looks like on the following diagram. Note that I removed attendees navigation property from person class.
Final version of classes
Now my classes look nice and they follow conventions I am using when naming classes and their members.
NB! Don’t forget to see properties of classes (properties windows) and modify their set names if set names contain numbers (I changed set name for Entity from Entity1 to Entities).

6. Let’s test!

Now let’s write simple testing program to see if MySQL data runs through Entity Framework 4.0 as expected. My program looks for events where I attended.

using(var context = new MySqlEntities())
{
    var myEvents = from e in context.Events
                    from a in e.Attendees
                    where a.Person.FirstName == "Gunnar" &&
                            a.Person.LastName == "Peipman"
                    select e;
 
    Console.WriteLine("My events: ");
 
    foreach(var e in myEvents)
    {
        Console.WriteLine(e.Title);
    }
}
 
Console.ReadKey();

MySQL Entity Framework test succeeded
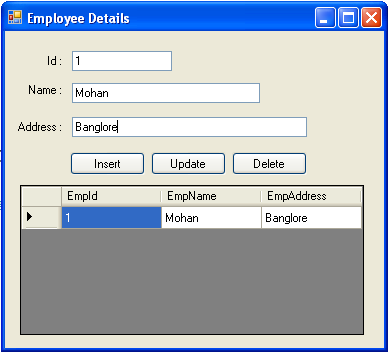
And when I run it I get the result shown on screenshot on right. I checked out from database and these results are correct.
At first run connector seems to work slow but this is only the effect of first run. As connector is loaded to memory by Entity Framework it works fast from this point on.
Now let’s see what we have to do to get our program work in hosting and cloud environments where MySQL connector is not installed.

Deploying application to hosting and cloud environments

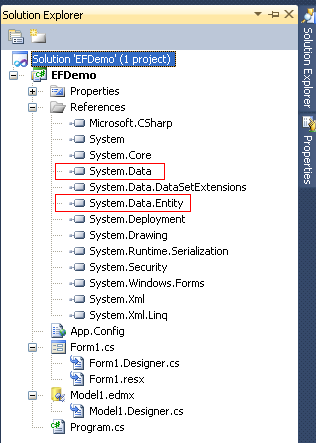
If your hosting or cloud environment has no MySQL connector installed you have to provide MySQL connector assemblies with your project. Add the following assemblies to your project’s bin folder and include them to your project (otherwise they are not packaged by WebDeploy and Azure tools):
  • MySQL.Data
  • MySQL.Data.Entity
  • MySQL.Web
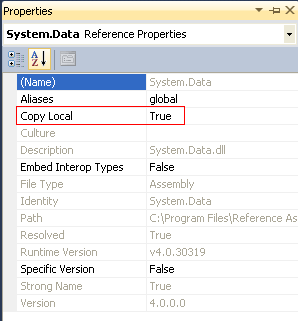
You can also add references to these assemblies and mark references as local so these assemblies are copied to binary folder of your application. If you have references to these assemblies then you don’t have to include them to your project from bin folder.
Also add the following block to your application configuration file.

<?xml version="1.0" encoding="utf-8"?>
<
configuration>
...
  <system.data
>
    <
DbProviderFactories
>
        <
add

            
name=MySQL Data Provider

            
invariant=MySql.Data.MySqlClient

            
description=.Net Framework Data Provider for MySQL

            
type=”MySql.Data.MySqlClient.MySqlClientFactory, MySql.Data,
                  Version=6.2.0.0, Culture=neutral,
                  PublicKeyToken=c5687fc88969c44d

        />
    </
DbProviderFactories
>
  </
system.data>
...
</configuration
>


Conclusion

It was not hard to get MySQL connector installed and MySQL connected to Entity Framework 4.0. To use full power of Entity Framework we used InnoDB engine because it supports foreign keys. It was also easy to query our model. To get our project online we needed some easy modifications to our project and configuration files.

[EF在VS2010中应用Entity framework与MySQL


[EF在VS2010中应用Entity framework与MySQL

在VS2010中应用Entity framework与MySQL
本文遵循“署名-非商业用途-保持一致”创作公用协议
本文讲述了在VS2010中使用EF与MySQL的一个简单示例。
工具安装:
1,MySQL
分别下载上面的三个软件,注意:VS2010目前支持的最好的是 Connector/NET 6.3.5,下载其他版本可能需要进一步的修改配置,最好安装此版本。然后依次安装,注意修改MySQL的初始密码并记住。

2,确认安装了 ADO.NET Entity Data Model
右击已有的C#工程,然后选择 Add New Item,在 Visual C# Items->Data栏目中看看有没有ADO.NET Entity Data Model选项,如果没有则还没有安装该模板;或你也可以在VS安装目录下看看C:\Program Files\Microsoft Visual Studio 10.0\Common7\IDE\ItemTemplates\CSharp\Data\1033\AdoNetEntityDataModelCSharp.zip 该文件存在不存在,如果不存在则需要安装该模板。如何安装呢,插入VS安装盘,选择修复,选中该组件安装就可以了。

3,使用MySQL workbench在 MySQL表中新建数据库 EFSample,在其中新建表customer,该表包含三个字段 id, Address, Name。如下所示:

4,新建C#控制台程序 EFSample,然后右击工程名,然后选择 Add New Item,在 Visual C# Items->Data中选择ADO.NET Entity Data Model,命名为 EFSampleModel.edmx:

 然后选择从数据库生成:

然后设置New Connection,选择MySQL Provider,如下所示:

选择要映射的数据库与表,并将模型命名为EFSampleModel:

至此,我们就能够在工程中看到创建的EFSampleModel.edmx:

5,我们可以使用xml编辑打开 EFSampleModel.edmx,在这个文件中定义了SSDL content,CSDL content以及 C-S mapping content。同样,EF为我们自动生成了与数据库对于的运行时类,这些类被定义在EFSampleModel.Designer.cs文件中,其中有对customer类的定义。该类定义了一个工程方法,我们可以使用该工厂方法来生成 customer 对象。
复制代码
    /// <summary>
    /// No Metadata Documentation available.
    /// </summary>
 [EdmEntityTypeAttribute(NamespaceName="EFSampleModel", Name="customer")]
    [Serializable()]
    [DataContractAttribute(IsReference=true)]
    public partial class customer : EntityObject
    {
        #region Factory Method
    
        /// <summary>
        /// Create a new customer object.
        /// </summary>
        /// <param name="address">Initial value of the Address property.</param>
        /// <param name="id">Initial value of the id property.</param>
        /// <param name="name">Initial value of the Name property.</param>
 public static customer Createcustomer(global::System.String address, global::System.Int64 id, global::System.String name)
        {
            customer customer = new customer();
            customer.Address = address;
            customer.id = id;
            customer.Name = name;
            return customer;
        }

        #endregion
    }
复制代码

6,新建 customer的部分类来添加对象的描述:
复制代码
namespace EFSample
{
    public partial class customer : global::System.Data.Objects.DataClasses.EntityObject
    {
        override public string ToString()
        {
            return string.Format("Customer Name: {0}, Address: {1}", this.Name, this.Address);
        }
    }
}
复制代码

7,支持大部分配置工作完成,下面开始编写与数据库进行交互相关的代码。修改 Program.cs为:
复制代码
using System;
using System.Collections.Generic;
using System.Linq;
using System.Text;
using System.Diagnostics;

namespace EFSample
{
    class Program
    {
        const int MaxRow = 10;

        static void DeleteData()
        {
            using (var ctx = new EFSampleEntities())
            {
                var customers = from c in ctx.customer select c;
                foreach (customer c in customers)
                {
                    ctx.DeleteObject(c);
                }

                ctx.SaveChanges();
            }
        }

        static void InsertData(customer[] cs)
        {
            using (var ctx = new EFSampleEntities())
            {
                foreach (customer c in cs)
                {
                    ctx.AddTocustomer(c);
                }

                ctx.SaveChanges();
            }
        }

        static void QueryData()
        {
            using (var ctx = new EFSampleEntities())
            {
                for (int i = 1; i <= MaxRow; i++)
                {
                    String str = i.ToString();
                    var results = ctx.customer.Where(c => c.Address == str);
                    foreach (customer c in results)
                    {
                        Console.WriteLine(c);
                    }
                }
            }
        }

        static void Main(string[] args)
        {
            customer[] cs = new customer[MaxRow];
            for (int i = 1; i <= MaxRow; i++)
            {
                StringBuilder sb = new StringBuilder();
                sb.Append("用户");
                sb.Append(i);
                customer c = customer.Createcustomer(i.ToString(), i, sb.ToString());

                cs[i - 1] = c;
            }

            Console.WriteLine("=================== TEST START ===================");

            DeleteData();

            Console.WriteLine(">> Storage test start...");
            Stopwatch sw = Stopwatch.StartNew();

            InsertData(cs);

            sw.Stop();
            Console.WriteLine("<< Store data seconds: " + sw.ElapsedMilliseconds / 1000 + " ( " + sw.ElapsedMilliseconds + " miliseconds)");

            Console.WriteLine(">> Query test start...");
            sw = Stopwatch.StartNew();

            QueryData();

            sw.Stop();
            Console.WriteLine("<< Query data seconds: " + sw.ElapsedMilliseconds / 1000 + " ( " + sw.ElapsedMilliseconds + " miliseconds)");

            Console.WriteLine(">> Delete test start...");
            sw = Stopwatch.StartNew();

            DeleteData();

            sw.Stop();
            Console.WriteLine(">> Delete data seconds: " + sw.ElapsedMilliseconds / 1000 + " ( " + sw.ElapsedMilliseconds + " miliseconds)");

            Console.WriteLine("Press any key to exit...");
            Console.ReadLine();
        }
    }
}
复制代码

8,测试。在上面的代码中,有三个辅助方法插入数据,查询数据,删除数据。然后在 main()函数中分别调用它们,并对性能进行初步估算。当我们只插入10记录时,其结果如下:

Using MySQL With Entity Framework


Using MySQL With Entity Framework

Posted by Ravindra T C  Articles ADO.NET in C#  July 20, 2012
In this article I am going to explain how to use MySQL with Entity Framework.
  • Printable Version
  • Author's other article
  • View Similar Articles
  • 0
Reader Level:
Introduction
Entity Framework is the next level of database programing which is much more flexible and adaptable than earlier methods like Regular ADO.Net and LINQ to SQL.
Prerequisites
  • Install Visual Studio 2008 or Visual Studio 2010
  • Install MySQL database on your local machine
  • MySQL database admin tool that allows you to create a database and run SQL statements. I am using phpMyAdmin which is a web interface.
  • Download and install MySQL Connector.
Getting Started

Run the XAMPP application and it will automatically install the Apache server, MySQL database, and FileZilla. After installing check whether these services are running or not. The following XAMPP control panel shows which of those services are currently running.

p1.bmp
Now the following steps will show how to connect to a MySQL database using C#.
Step 1 : Open MySQL Admin page and create a new database.
p2.bmp
Step 2 : After creating the new database, create a new table.
CREATE TABLE `employee` (
`EmpId` bigint (20) NOT NULL,
`EmpName` varchar (200) default NULL,
`EmpAddress` varchar (255) default NULL,
PRIMARY KEY (`EmpId `)
) ENGINE=InnoDB DEFAULT CHARSET=latin1;
Step 3 : After creating the new table, open Visual Studio and click on New Project and name the project. It will open the new project, then click on Solution Explorer (F4), right-click on "Reference" to add a new reference into the project. Reference those two .dll files to the project (MySql.dll (Win apps), MySql.Data.Entity.dll).
p3.bmp
Step 4 : In Solution Explorer go to the "System.Data" properties and set the "Copy Local" property to true.

The Copy Local property (corresponding to CopyLocal) determines whether a reference is copied to the local bin path. At run time, a reference must exist in either the Global Assembly Cache (GAC) or the output path of the project. If this property is set to true, the reference is copied to the output path of the project at run time.
p4.bmp
Step 5 : Add new Entity Data Model into the project.
p5.bmp
Step 6 : Select "Generate from database" in Entity Data Model Wizard.
p6.bmp
Step 7 : Select MySQL Database.
p7.bmp
Step 8 : Set Connection properties for MySQL.
p8.bmp
Step 9 : This step will display all the tables, views and stored procedures.
p9.bmp
Step 10 : By double-clicking on Model1.edmx, it will open the EDM designer which displays all the entities for selected tables.
p10.bmp
Step 11 : The following code will insert the data into the MySQL table.
private void btnInsert_Click(object sender, EventArgs e)
{
    testdbEntities testcontext = new testdbEntities();
    try
    { 
        employee emp = new employee 
                   {
                       EmpId = int.Parse(txtId.Text),
                       EmpName = txtName.Text,
                       EmpAddress = txtAddress.Text
                   };
        testcontext.employee.AddObject(emp);
        testcontext.SaveChanges();
        MessageBox.Show("Record Inserted successfully.""Insert"MessageBoxButtons.OK,MessageBoxIcon.Information);
        LoadToGrid();
    }
    catch (Exception ex)
    { 
        MessageBox.Show(ex.InnerException.ToString());
    } 
}
 
Step 12 : The following code will update the data in the MySQL table.

private void btnUpdate_Click(object sender, EventArgs e)
{
    int EmpId;
    string s = txtId.Text;
    int.TryParse(s, out EmpId);
    testdbEntities testcontext = new testdbEntities();
    try
    {
        employee emp = testcontext.employee.First(i => i.EmpId == EmpId);
        {
            emp.EmpName = txtName.Text;
            emp.EmpAddress = txtAddress.Text;
            testcontext.SaveChanges();
            MessageBox.Show("Record Updated successfully.""Update"MessageBoxButtons.OK,MessageBoxIcon.Information);
            LoadToGrid();
        };
    }
    catch (Exception ex)
    {
        MessageBox.Show(ex.InnerException.ToString());
    }
}
 
Step 13 : The following code will delete the data into MySQL table.

private void btnDelete_Click(object sender, EventArgs e)
{
    int EmpId;
    string s = txtId.Text;
    int.TryParse(s, out EmpId);
    testdbEntities testcontext = new testdbEntities();
    try
    {
        employee emp = testcontext.employee.First(i => i.EmpId == EmpId);
        testcontext.employee.DeleteObject(emp);
        testcontext.SaveChanges();
        MessageBox.Show("Record Deleted successfully.""Delete"MessageBoxButtons.OK,MessageBoxIcon.Information);
        LoadToGrid();
    }
    catch (Exception ex)
    {
        MessageBox.Show(ex.InnerException.ToString());
    } 
}
 
Step 14 : The following function will load the data from the table and bind it to a GridView.
 
private void LoadToGrid()
{
    testdbEntities testcontext = new testdbEntities();
    var load = from g in testcontext.employee select g;
    if (load != null)
    {
        dataGridView1.DataSource = load.ToList();
    }
}
 
Step 15 : Final Result

p11.bmp

DBLinq (MySQL exactly) Linq To MySql


DBLinq (MySQL exactly) Linq To MySql

分类: MySql 238人阅读 评论(0) 收藏 举报
 Linq to SQL很好用,可惜只支持Microsoft SQL Server 和Microsoft SQL Server Compact Edition,目前比较成熟的免费解决方法是DBLinq(PS:ALinq超贵,实际上很多类似的小东西都超贵),它可以提供provider实现Linq to MySQL, Linq to SQLite, Linq to Oracle, Linq to PostgreSql... 甚至Linq to SQL Server on Linux.

一、工具:
Dblinq ;
MySQL 5.0以上,编程主机需要安装;
VS2008
二、生成DataContext cs文件
DbMetal.exe -provider=MySql -database:your_db -server:your_server -user:root -password:your_pass -namespace:namespace -code:filename.cs -sprocs
//注,名称空间是mysqllinq,-sprocs一定要

出现了以下错误:

DbMetal: Could not load databaseConnectionType type 'MySql.Data.MySqlClient.MySqlConnection, MySql.Data'.  Try using the --with-dbconnection=TYPE option.
解决方法是添加MySql.Data.dll文件到DBMetal.exe所在目录下

三、将文件DataContext cs放到项目文件中
注意:cs文件放在项目的首层,比如App_Code中,或者内库中
using DbLinq.Linq;
using DbLinq.Linq.Mapping;
(如果不是放在App_Code中,在此添加引用)

四、在VS 2008中新建类项目DALMySQL,并添加引用

DbLinq.dll;
DbLinq.MySql.dll;
MySql.Data.dll;
//上面三个在DbLinq-0.18\build中可以找到。
System.Data.Linq.dll;
//在C:\Program Files\Reference Assemblies\Microsoft\Framework\v3.5\System.Data.Linq.dll
//这是一要引用!!!
五、添加Web_App项目,添加对项目DALMySQL的引用
六、在aspx.cs页面中添加引用:

using MySql.Data;
using MySql.Data.MySqlClient;
using mysqllinq;//DataContext cs文件的名字空间
//省略
[csharp] view plaincopy
  1. using System;  
  2. using System.Web;  
  3. using System.Web.UI;  
  4. using DbLinq;  
  5. using DbLinq.MySql;  
  6. using MySql.Data;  
  7. using MySql.Data.MySqlClient;  
  8. using System.Linq;  
  9.   
  10. //主意看我有哪些引用!  
  11.   
  12.   
  13. namespace DBLinqTest  
  14. {  
  15.   
  16.   
  17.     public partial class Default : System.Web.UI.Page  
  18.     {  
  19.   
  20.         public virtual void button1Clicked (object sender, EventArgs args)  
  21.         {  
  22.             string connStr = @"server=localhost;database=DB1;user=AAA;pwd=123456;port=3306;";  
  23.              
  24.             MySqlConnection conn = new MySqlConnection (connStr);  
  25.             Db1 db1 = new Db1 (conn);  
  26.             var data = from a in db1.Test1  
  27.                 select a;  
  28.             foreach (var d in data) {  
  29.                 Response.Write (d.ID + " " + d.Name);  
  30.             }  
  31.             button1.Text = "You clicked me";  
  32.         }  
  33.     }  
  34. }